How to Completely Uninstall Git from Your Computer on Windows, Mac, and Linux ?
Completely uninstalling Git from your device is not always a simple task. Indeed, the standard uninstallation often leaves behind many residual files that continue to clutter up your hard drive.
Fortunately, Debugbar has the solution to completely uninstall Git from your computer (MacOs, Windows, Ubuntu)! Thanks to our step-by-step guides, you’ll know exactly what to do regardless of your operating system.
Git, What Is It and Why Uninstall It?
Git is an open source version control software that allows you to:
- Track all changes made to your projects, whether it’s source code, documents, or any files.
- Collaboratively work on the same project managing versions.
- Revert to previous versions if needed.
- Compare different versions.
- Easily share the project with other developers.
The big advantage of Git is that it is decentralized. This means there is no central server, and each developer has a complete local copy of the project’s history. This makes collaborative and distributed work easy.
In short, Git is the go-to tool for developers to manage their projects, but it can work for any project requiring version tracking.
However, although extremely powerful, Git can sometimes cause issues and require a complete uninstall because of:
- Compatibility issues with other software,
- Frequent crashes and freezes,
- Insufficient performance,
- Repeated reinstallations without success,
- Desire to install another version control system,
- etc.
The problem is that uninstallation does not always go as planned and Git can put up some resistance… No worries, we have the solution!
How to Completely Uninstall Git from Your Device?
Before going through the steps for each operating system, it is essential to keep in mind some general advice for a clean and complete uninstall of Git:
- Use native uninstallation tools (Control Panel on Windows, terminal on Linux, etc).
- Remember to manually delete any remaining Git folders after uninstalling.
- Adapt the commands according to your specific Linux distribution.
- Restarting the machine is recommended after uninstalling.
Right, now that this is said, let’s move on to uninstalling.
How to Uninstall Git on Windows?
You are using Windows and want to clean up by removing Git? Here is how to proceed:
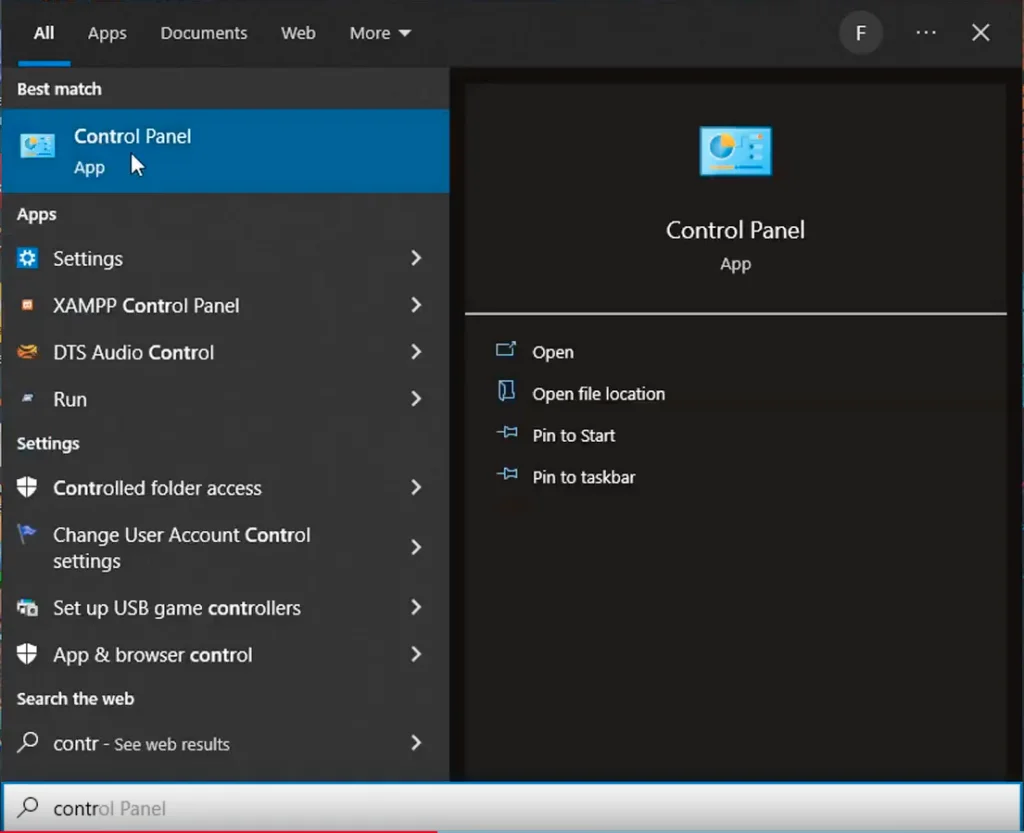
- Click the “Start” icon in the bottom left.
- Type “Control Panel” in the search bar and click the icon to open the Control Panel.

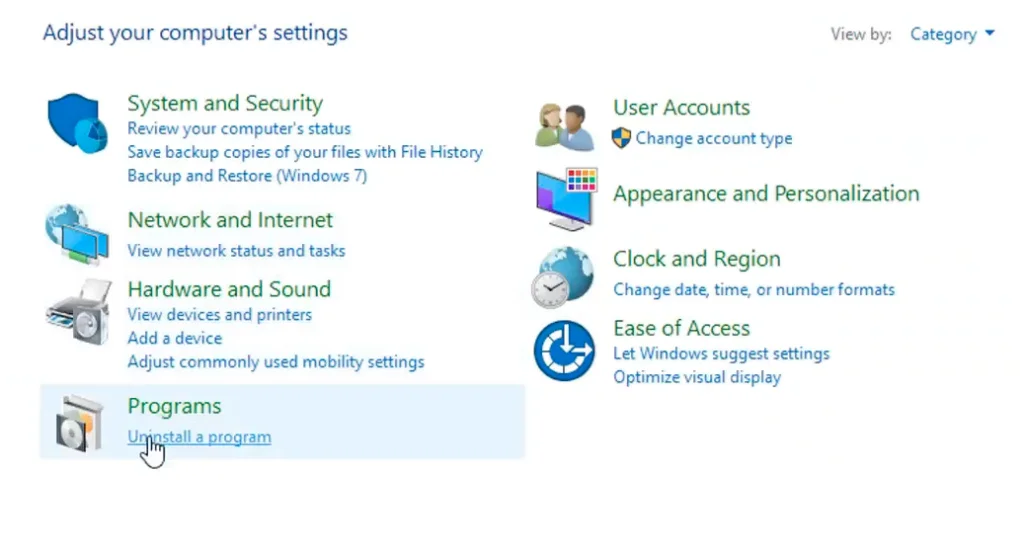
- Go to the “Programs” section then “Programs and Features“.

- Click “Uninstall a program“.
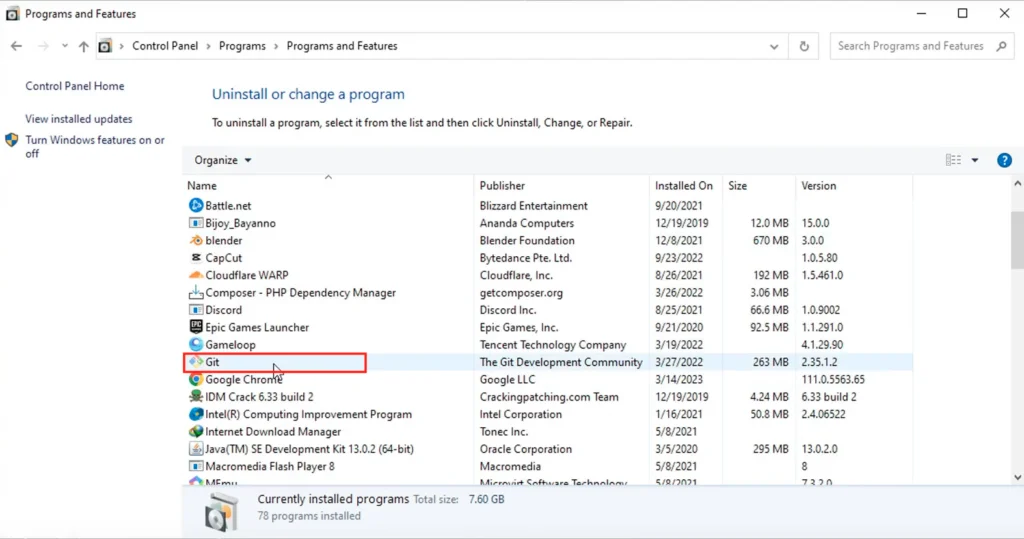
- Find Git in the list of installed programs.

- Right click on Git and select “Uninstall“.

- Follow the on-screen instructions to confirm the uninstall.
- Once the uninstall is complete, manually delete any remaining Git folders in any directory (for example in C:\Program Files\Git).
- Restart your computer to complete the uninstall.
By following these simple steps, you can be sure to completely remove Git from your Windows system. Don’t forget the manual deletion of remaining folders, it is a crucial step! A final reboot will erase any last traces.
How to Uninstall Git on MacOs?
You are a Mac user and want to remove Git from your system? Here is how to proceed:
- Open the Finder.
- Go to the Applications folder.
- Find the Git application.
- Right click on the Git application and select “Move to Trash“.
- Empty the Trash to permanently delete the Git application.
- Manually delete any remaining Git folders (for example in /usr/local/git).
- Restart your Mac to complete the uninstall.
By following these steps, you can be sure to completely remove Git from your MacOs system. Don’t forget to empty the Trash and delete remaining folders before restarting your computer.
How to Uninstall Git on Ubuntu (Linux)?
You are using Ubuntu or a Debian Linux based distribution? Here is how to completely uninstall Git:
- Open a terminal by pressing Ctrl+Alt+T or by searching “Terminal” in the menu.
- Type the command sudo apt remove git and execute it by pressing “enter” to remove the Git software.
- Once executed the system will ask you if you want to continue (Y/N): Type “Y” then execute the command by pressing enter.
- Type sudo apt autoremove to remove unused dependencies.
- Manually delete any remaining Git folders (for example in /usr/share/git).
- Restart your machine to complete the uninstall process.
By going through the terminal and these dedicated commands, you can be sure to completely remove Git from your Linux distribution. As with Windows, remember to delete remaining folders and restart your device.
How to Uninstall Git in a Nutshell…
To summarize, here are the key steps to completely remove Git from your computer:
- On Windows: uninstall via Control Panel, delete remaining folders and restart.
- On Ubuntu: uninstall with apt remove or similar command, check for an hypothetical remaining folder and delete it and restart.
- On MacOs: move the application to the Trash, empty the Trash, delete the remaining folders and restart.
Finally, don’t forget to manually delete residual files/folders after uninstalling and restart the machine to finalize the uninstall process.
By following this step-by-step tutorial, you can now completely uninstall Git from your device regardless of your operating system.